Mustang Club of Maryland

Home of the Mustang club of Maryland
It is currently Sat Dec 21, 2024 2:29 pm

All times are UTC - 5 hours [ DST ]


Post new topic Reply to topic  [ 11 posts ] 
Author Message
 Post subject: Fixing your "Gansta Lean" seat!
PostPosted: Thu Mar 17, 2011 4:13 pm 

Joined: Mon Jul 12, 2010 5:03 pm
Posts: 427
Location: Elkridge, MD
I just fixed my SVO seat and floorpan. I have some pics from that. Also getting ready to start on my 93 DD seat. This is a VERY common problem with the Fox chassis Mustangs. Heck, my old 92 LX 5.0 had the seat break while under warranty still.. Will be adding pics and info shortly!

_________________
-Eric
2010 GT Premium
85 SVO 1C
95 Ranger Splash


Top
 Profile  
 
 Post subject: Re: Fixing your "Gansta Lean" seat!
PostPosted: Thu Mar 17, 2011 7:56 pm 
User avatar

Joined: Mon Dec 11, 2006 9:08 am
Posts: 456
Location: New Windsor, Md
bad thing is, ford fixed the california state police cars, but never responded to my call on my 81.

_________________
Real trucks don't have spark plugs. nor do the say nissan or toyota


1985 Mustang Gt Red convertible


Top
 Profile  
 
 Post subject: Re: Fixing your "Gansta Lean" seat!
PostPosted: Thu Mar 17, 2011 10:17 pm 

Joined: Mon Jul 12, 2010 5:03 pm
Posts: 427
Location: Elkridge, MD
I heard that "rumor" but I think they said that to appease people. Supposedly it was across the board on Fox bodies for that and the floor pan plate. The stock theater seat frame I took out of the 93 was trashed horribly. I didn't even see the half-assed repair til I took it out to put in the GT seats I got for it. My SVO even has the reinforcement plate in the floor from the factory and the floor cracked. But the PO leaned/pushed/pulled on everything to get in and out of the car. Dead pedal was loose/falling out, tilt mechanism on column was loose. Console was broken in 5-6 places, even the seat track was broken in 3 places and had some horrible welds on it. I couldn't even reuse the upper frame that was in it. Someone who "tried" to repair it totally blew away part of the metal with the heat too high trying to weld it, then they used pop rivets... The track was so bad the bottom frame was twisted too! Luckily I got a set of SVO seats from a buddy that the leather was toast on and had some better frames for the DS and better upper cushion to take from the PS seat...
I've got my work cut out for me on the 93 frame. Lotsa spot welds broken, several cracks, and twisted pretty good. My neighbors are going to think I'm nuts tomorrow while I'm outside at the curb boucing up and down on the frame to un-twist it! LOL!
My back is gonna thank me for this fix. With the work I've had done to it, I felt the difference immediately last weekend when I put the seat back into the SVO!

_________________
-Eric
2010 GT Premium
85 SVO 1C
95 Ranger Splash


Top
 Profile  
 
 Post subject: Re: Fixing your "Gansta Lean" seat!
PostPosted: Fri Mar 18, 2011 9:58 pm 

Joined: Mon Jul 12, 2010 5:03 pm
Posts: 427
Location: Elkridge, MD
Mission accomplished. I'm wore out. Will work on the pics, tools list, sometime this weekend. Even ran my welder out of ammo.

_________________
-Eric
2010 GT Premium
85 SVO 1C
95 Ranger Splash


Top
 Profile  
 
 Post subject: Re: Fixing your "Gansta Lean" seat!
PostPosted: Tue Mar 22, 2011 10:30 pm 

Joined: Mon Jul 12, 2010 5:03 pm
Posts: 427
Location: Elkridge, MD
Sorry for the delay. Been helping my Dad move back into his house after a fire in Sept... Rainy day tomorrow will help with stuff I need to do around here at home (along with these pics)!

_________________
-Eric
2010 GT Premium
85 SVO 1C
95 Ranger Splash


Top
 Profile  
 
 Post subject: Re: Fixing your "Gansta Lean" seat!
PostPosted: Sun Mar 27, 2011 3:09 pm 

Joined: Mon Jul 12, 2010 5:03 pm
Posts: 427
Location: Elkridge, MD
OK, now finally got most of the stuff done with Dad.

Tools needed:
-15mm wrench (front floor) and socket/ratchet (rear floor)
-Philips screwdriver
-T45 Torx bt
-13mm socket
-Hog ring pliers and clips
-End cutters (to cut old hog rings), or the "special" one to cut them
-Large flat blade screwdriver
-Various ways to clamp the frame as welding (vice grips/c-clamps/etc)
-MiG/Flux core welder and proper face gear
-Grinder of some sort to clean and prep
-Paint for finished work

First. unbolt the complete seat from the floor. You may have the plastic covers on the mounts to pop off to get to the bolts/nuts. You'll most likely have to use the wrench at the front mounts as there isn't much room. On the rear the socket will do you fine with a short extension for knuckle room.
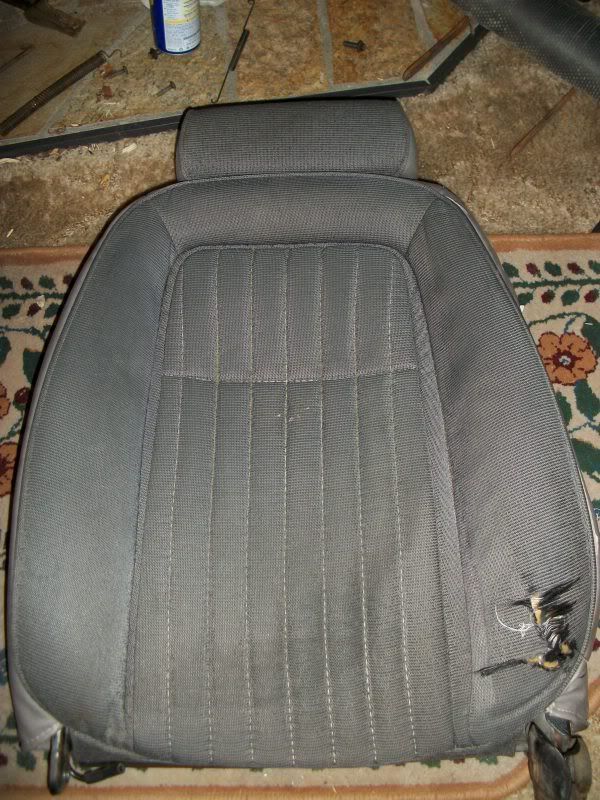
Then you can remove the seat. If you have the power lumbar support, make sure to unplug the connection. Unscrew the recline/hinge cover screws and set in a safe place. The opposite side (along the trans tunnel) is a T45, and the bolts into the lower frame are 13mm. Unbolt the top from the bottom.

And you should have this, well maybe not a ratty looking, LOL. It was in better shape before the frame really took a dump... ALOT better than the stock seat I threw in the dumpster.
Image

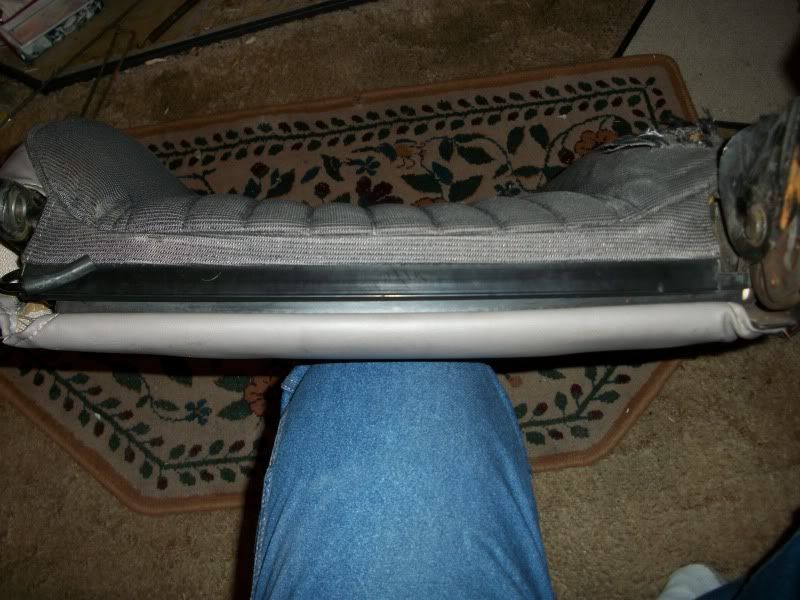
Then flip it upside down and unclip the ziplock plastic, some seats may still have a zipper. Esp. on older Foxes
Image

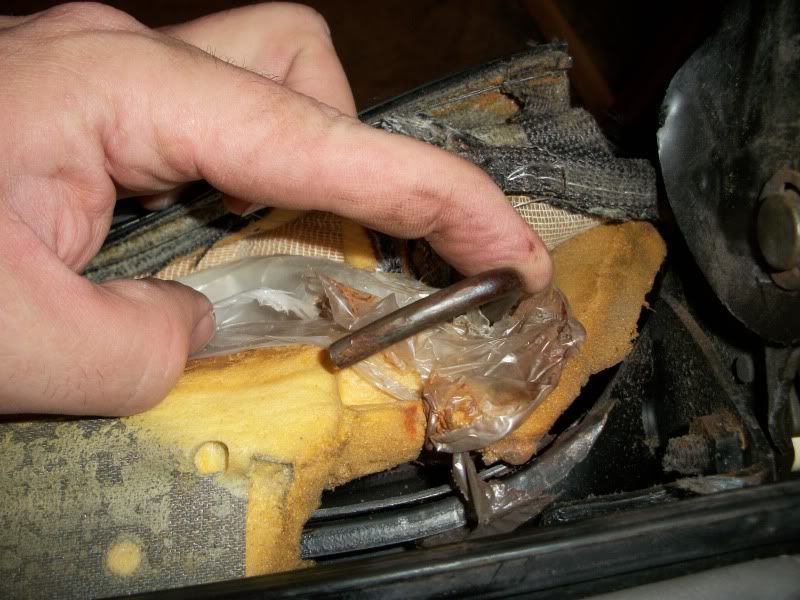
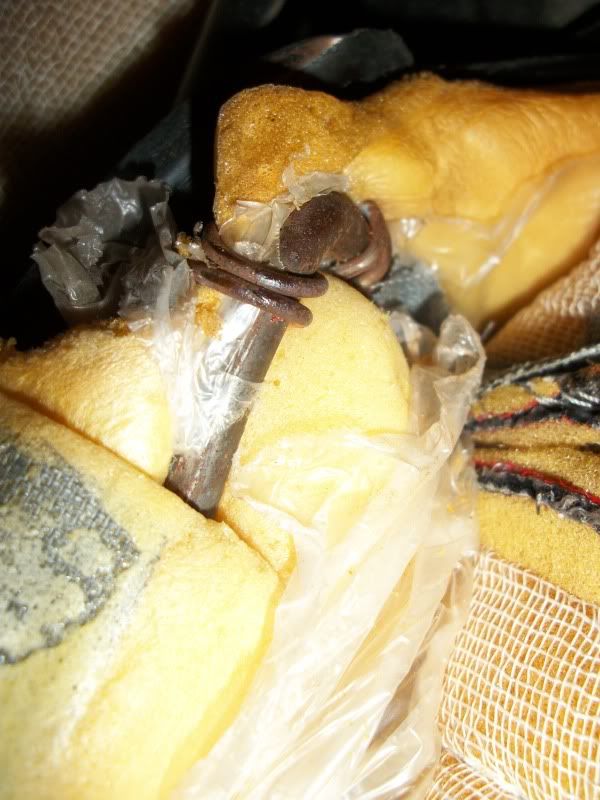
Then along the bottom you'll have these vertical rods held in by hog rings on each side. Clip the rings and pull the rods straight out. Be careful not to tear the sleeve they fit into in the cover while doing this. Over the years the fabric may have gotten a bit dry... Aso the rust you see if from my sunroof leaking. Where I used to live the incline prevented it from draining into the drains properly during severe storms... That will be another "how to" here. As I need to wait for a nice warm day to paint the frame around the glass a bit and to let the seals get nice and warm and soft in the sun...
Image
Image

_________________
-Eric
2010 GT Premium
85 SVO 1C
95 Ranger Splash


Last edited by etc1006 on Sun Mar 27, 2011 5:05 pm, edited 1 time in total.

Top
 Profile  
 
 Post subject: Re: Fixing your "Gansta Lean" seat!
PostPosted: Sun Mar 27, 2011 3:35 pm 

Joined: Mon Jul 12, 2010 5:03 pm
Posts: 427
Location: Elkridge, MD
Next pull the flip lever on the latch back and unscrew the bezel. Now you're ready to start to peel the cover up towards the top. You may have to reach your hand up inside to compress the foam to help you remove the cover. Also in approx. the middle from the top/bottom note the rod that goes from side to side in the sleeve in the cover. The vertical rods go OVER these when you put them back in to pull that styling line in of the cloth.

Image

Once you get that up and over. You'll need to lift the foam out in the front to get to the latch for the headrest before you can totally remove everything. Once you get to the sleeve use the flatblade screwdriver to gently pry the catch up and push/pull the headrest and sleeve.

Image

After pulling the headrest you can pop the remainder of the upholstry and foam off the top of the frame.

Image

Before prepping the frame with the grinder at all the bad areas. This frame has to have been one of the worst ones I have done(I've done about 6-8 of them), other than my SVO seat, but that was a horrible attempt by someone else I found when I got into it. Most just have a few cracks and I actually have to twist it a bit by putting it on the curb and jumping/stepping/standing on it to get it back into square. This was so bad I was to twist it by hand. So I got the vise grips and clamps after grinding the area and started to tack weld to keep it straight.

_________________
-Eric
2010 GT Premium
85 SVO 1C
95 Ranger Splash


Top
 Profile  
 
 Post subject: Re: Fixing your "Gansta Lean" seat!
PostPosted: Sun Mar 27, 2011 4:15 pm 

Joined: Mon Jul 12, 2010 5:03 pm
Posts: 427
Location: Elkridge, MD
Some carnage pics. :blink:
Image
Image
Image
Image
Image
Image
Image
Image
Image

I think some of this was from me getting into and out of the car while I was having my pre and post op back issues. :eek:

_________________
-Eric
2010 GT Premium
85 SVO 1C
95 Ranger Splash


Top
 Profile  
 
 Post subject: Re: Fixing your "Gansta Lean" seat!
PostPosted: Sun Mar 27, 2011 4:24 pm 

Joined: Mon Jul 12, 2010 5:03 pm
Posts: 427
Location: Elkridge, MD
Now prep by using the grinder. I used the flap wheels in 60/80 grit on my 4" grinder.

Image
Image
Image


I only had flux core wire right now. At the broken spot welds I used my 2nd (up from lowest) heat setting as there was 2 layers of metal there and to get to penetration for a decent rosette. At the thinner area I used the lowest setting. Turns out near the end it started to stutter some and I ended up running out of wire after I did what I needed to do. I was just doing a few extra reinforcment welds. The wire was getting looser on the spool as it got to the last few feet. I now have an excuse to install my MiG conversion that I've had sitting in the box for a couple of years. :btu:

_________________
-Eric
2010 GT Premium
85 SVO 1C
95 Ranger Splash


Top
 Profile  
 
 Post subject: Re: Fixing your "Gansta Lean" seat!
PostPosted: Sun Mar 27, 2011 4:55 pm 

Joined: Mon Jul 12, 2010 5:03 pm
Posts: 427
Location: Elkridge, MD
These welds weren't quite as pretty as the ones I did on the SVO seat, probably from the wire getting low... Knock the flux off and a little grinding to pretty up and some paint and all ready to put back together. Also note the two bent out clip looking things in the inside edge of the frame. They are for the lumbar airbag. Just use the screwdriver and gently bent them inward and lift the bag out on removal. Place back in and hit with a hammer to put the tabs back down. Also if your plastic seat bolt bushing is missing/worn on the hinge side by the trans tunnel there is a brass/oil-lite bushing that is aperfect fit. I have to find the McMaster Carr # and put it up here. The shipping cost more than the damn bushings! IIRC it is the same part as even the early Mustangs.... Assembly is reverse of the teardown. And remember to run the vertical rods in the sleeves in the cover and over the horizontal bar in the cover all the way up and even with the bottom rod molded into the foam. Hog ring the arms to the molded in rod snap the zip lock back together and you're done!

Image
Image
Image
Image
Image
Image
Image

Painted and pretty. Cover back on, I used a bit of foam at the left side bolster where the cloth is torn to fill in where the metal flexing ate it out to firm it up some. I'll keep my eyes open for another seat I can rob the cloth off of eventually, I guess. From the looks of things with my situation I'll still be a couple of years still til I do/finish school and a new job...

Image
Image
Image

And a pic of my SVO console repainted. Took alot of advantage of it being nice and warm on Friday 2 weeks ago! I have a friend who is in the Mustang parts/resto business in Alabama who went to great lengths to get this color matched correctly for the 80's charcoal gray interior paint. The stuff the other people sell just isn't right (some have too much red/or blue in it). The coin tray is an original grey molded piece and the console was originally blue. Going to do more of the interior with this paint. Luckily most of the car had tinted windows and the plastics aren't in as bad of shape as they could be from being in AZ it's whole life.

Image

And my fixed SVO seat. I got a set of Halo headrests @ Crazy Rays last summer on the cheap out of an EXP to add to them. The drivers seat cloth is so-so. Part has been redone in some type of fuzzy mouse fur like cloth instead of the correct light demin feel... I replaced both frames and cushions on this from a set of leather ones that the leather was shot, as the top frame was fubar from a previous attempt at repair and the bottom frame was twisted from the seat track being broken and welded in 3 places... :banghead: I tossed the seat cover in the washing machine on gentle to clean it up as best I could, LOL! Now the passenger seat really looks like hell! I'll get the rug scrubber/upholstry wand out when the weather ever warms up and do the rest of the seats on both cars...

Image
Image

_________________
-Eric
2010 GT Premium
85 SVO 1C
95 Ranger Splash


Top
 Profile  
 
 Post subject: Re: Fixing your "Gansta Lean" seat!
PostPosted: Sun Mar 27, 2011 5:39 pm 

Joined: Mon Jul 12, 2010 5:03 pm
Posts: 427
Location: Elkridge, MD
Ok, here's the direct link the McMaster Carr for the bushing.
http://www.mcmaster.com/#2938t12/=bmbkbg

Enjoy!! :usaflag:

_________________
-Eric
2010 GT Premium
85 SVO 1C
95 Ranger Splash


Top
 Profile  
 
Display posts from previous:  Sort by  
Post new topic Reply to topic  [ 11 posts ] 

All times are UTC - 5 hours [ DST ]


Who is online

Users browsing this forum: No registered users and 1 guest


You cannot post new topics in this forum
You cannot reply to topics in this forum
You cannot edit your posts in this forum
You cannot delete your posts in this forum
You cannot post attachments in this forum

Search for:
cron
Powered by phpBB © 2000, 2002, 2005, 2007 phpBB Group